I’m using the OpenLiteSpeed web server, and when I checked my browser’s developer tools, I noticed that HTTP/3 protocol was not being applied. Since I knew it supported HTTP/3 protocol, I thought it might be a configuration issue, so I looked for some documentation.
First, I tried using the HTTP/3 protocol Check tool to see if it was applied to the site, as it can be temporarily disabled due to a number of issues. As it turns out, it was not applied to the site.
After checking the official documentation, I realized that you need to enable it in the OpenLiteSpeed WebAdmin Console and open the ports for it to take effect. I set it up as described, and HTTP/3 protocol is now working fine.
If the HTTP/3 protocol is not applied after installing the OpenLiteSpeed web server, please refer to the instructions below to enable it.
Table of Contents
HTTP/3 Key Features
- QUIC-based: Until HTTP/2, HTTP used TCP, but HTTP/3 protocol uses the UDP-based Quick UDP Internet Connections (QUIC) protocol. QUIC provides faster and more efficient connections than TCP.
- Low latency: Due to the nature of QUIC, it has much lower latency than TCP, which can significantly improve web page loading speeds.
- Highly secure: Native support for TLS encryption for secure data transfer.
- Header compression: Reduce network traffic by further developing HTTP/2’s header compression capabilities.
Check tool
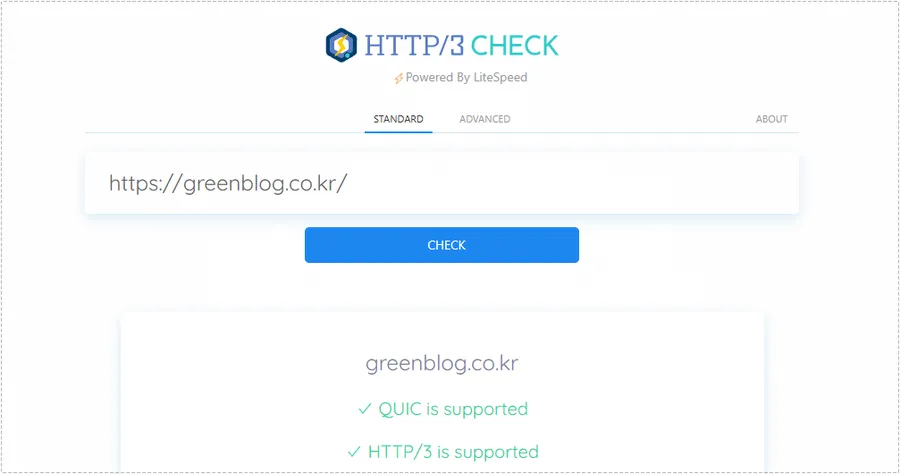
It might not apply temporarily due to caching, so it needs to be checked. There are several tools available, but the HTTP/3 Check tool is a quick way to check.
Once you’re on the site, enter your domain and click the ‘Check’ button, you should see UIC is supported HTTP/3 protocol is supported, as shown above. If this is the case, the feature is enabled.
If you get an error in red, it’s not applied and you’ll need to follow the instructions below to apply it.
Open UDP port 443
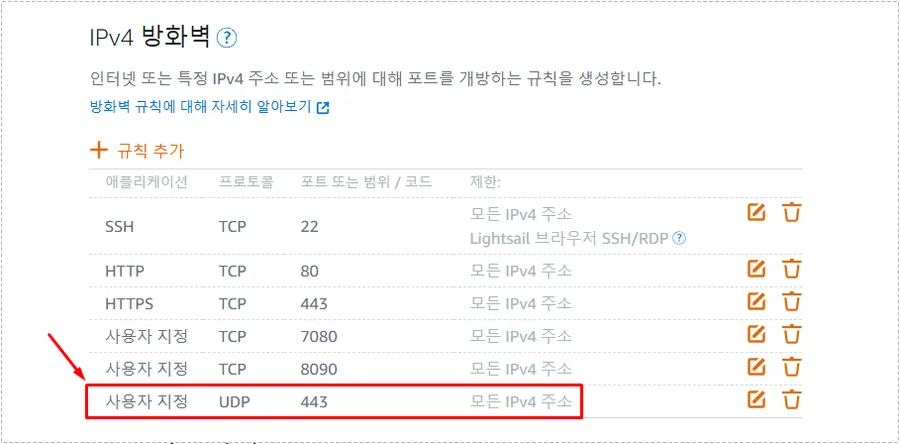
In order to enforce the HTTP/3 protocol, we first need to open the UDP 443 port. In Lightsail, you can do this by navigating to ‘Networking’ in the instance menu, then clicking ‘Add Rule’ in the IPv4 Firewall, then selecting Custom, UDP, Port 443 to open it.
- QUIC is a UDP-based: HTTP/3 uses the QUIC protocol, and QUIC uses UDP at the transport layer. Because of this, UDP port 443 must be open to use HTTP/3. The existing TCP 443 port is for HTTP/2 and HTTPS.
- Setting up QUIC’s Quick Connect: QUIC uses 0-RTT connections for connection initialization, which allows it to establish connections faster than TCP. In the process, it uses UDP to implement fast connections. This is especially beneficial for real-time applications where latency is critical.
- Advantages of UDP: It is not connection-oriented and sends datagrams without maintaining a connection. This minimizes network latency, makes it particularly robust to packet loss, and eliminates header compression and multiplexing issues that can occur with TCP.
The short answer to why we’re opening it is that we need to open the port because we’re sending data over UDP instead of the traditional TCP method we’re used to.
Webadmin Console Settings
Once you have opened the UDP 443 port, you must now activate it in the OpenLiteSpeed Webadmin for it to take effect. You can access the administration tool by connecting to your IP address:7080 in your browser.
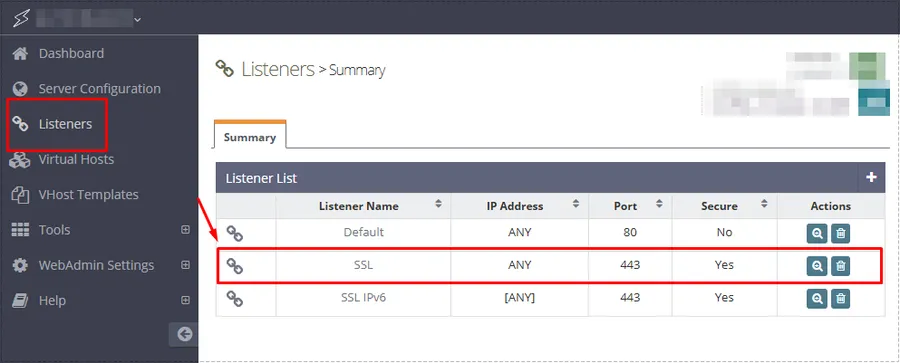
Once you’re in the Webadmin Console, select “Listeners” from the left menu and click “SSL(443)”.
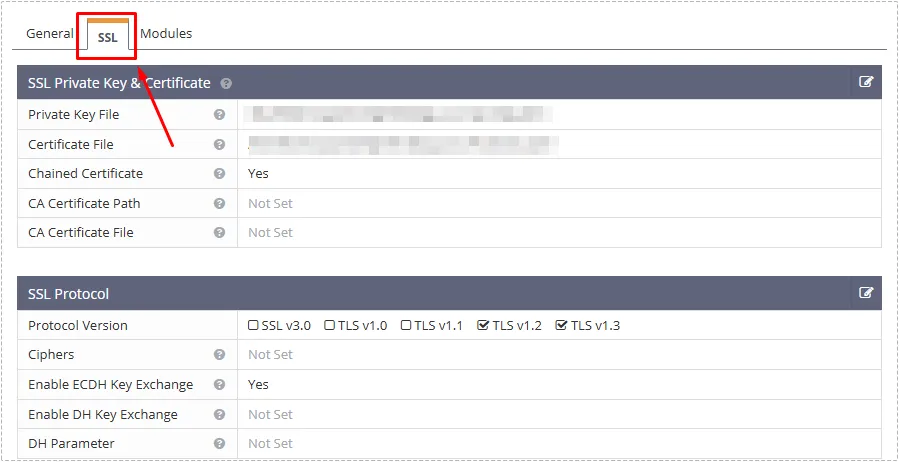
When you connect to SSL (port 443), you’ll see a screen like the one above. From here, you can enter SSL at the top.

Once you’re in the SSL section, you can change the Open HTTP3/QUIC (UDP) Port setting to ‘Yes’ in the Security & Features section. To change the setting, click the Edit button on the right and check ‘Yes’.
If you are using SSL IPv6, you can follow the same instructions above to set the Open HTTP3/QUIC (UDP) Port to ‘Yes’.
Now that everything is set up, you can restart the server by clicking on the IP address in the top left corner. After clearing your LiteSpeed Cache and browser cache, check the protocols in the browser developer (F12) tool and you should see the changes applied.
▶ AMP for WP Plugin: How to Apply Automated Ads
▶ How to remove unnecessary text in WordPress all at once
▶ What is the LiteSpeed_task_lqup error and is it essential for the site?

