When the PageSpeed Insight measurement results showed that the site was too slow, I looked for various ways to speed up the loading speed, and the first thing I installed was a cache plugin . However, an error occurred saying that the WordPress WP CACHE definition was not added.
Since I’m using Amazon Lightsail, to fix this error I opened wp-config.php with the VI editor via SSH and added define(‘WP_CACHE’, TRUE);
But after adding it, WordPress became unreachable, so I spent hours searching overseas communities to try to restore it.

<Plugin List Drop-ins Error>
Eventually, I was able to restore it by connecting the snapshot I had created a few days ago, but I gave up on trying to resolve the error because I thought it might not work again.
But I recently tried again while maintaining WordPress and succeeded, so I’m going to organize the method I used for those who are looking for it because they don’t know much about programming like me.
Since I use Amazon Lightsail, I will explain based on that.
Table of Contents
Create a snapshot
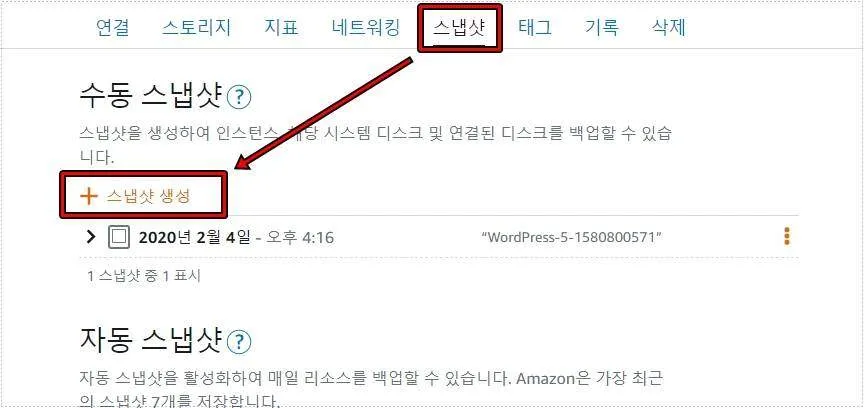
If you go to Amazon Lightsail and go to Lightsail from the top service, you will see the instance you are using, and if you click on it, you will be able to see the snapshot shown above.
This is a backup so that if there is a problem with WordPress, you can restore it by creating a snapshot as an instance. When you click Create Snapshot, the backup process will start, and depending on the storage capacity, it may take several tens of minutes.
If you encounter problems with WordPress when adding the WordPress WP CACHE definition, you can create an instance from the snapshot you created and connect to it.
Disable cache plugin

If you have a cache plugin installed, you will need to disable it first in order to add the WP_CACHE definition to wp-config.php.
Add wp-config

If you have created a snapshot and made a backup, you can go to Connection in the top menu and click <Connect using SSH>.
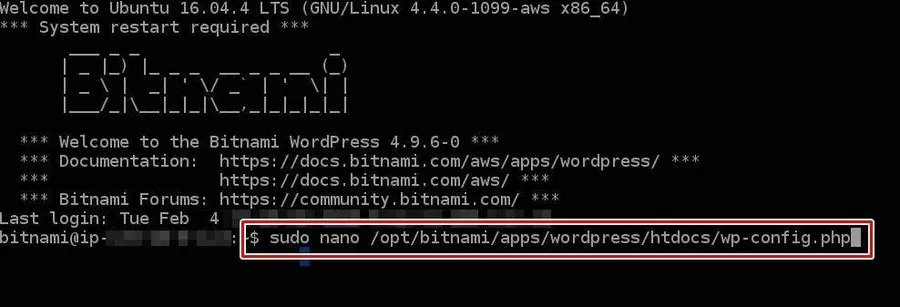
If you are connected to the terminal via SSH, type sudo nano /opt/bitnami/wordpress/wp-config.php to open the wp-config.php file in the nano editor.
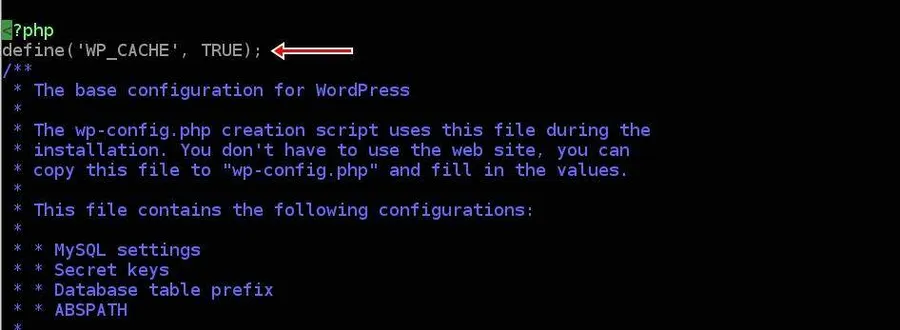
If you opened wp-config.php with an editor, add define(‘WP_CACHE’, TRUE); right below <?php at the very top and press Ctrl+O to save.
WordPress WP CACHE Results
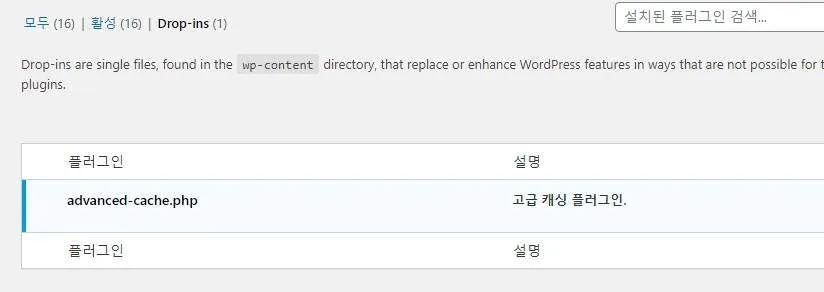
After completing the above process, if you go back to Drop-ins in the plugin list, you can see that the WordPress WP CACHE error has been resolved. This method was reported in the overseas community, and when you look at other articles, you can see complicated parts such as granting permissions.
So even if you do this method, it may not work. If you are using Light Sail like me, I recommend that you create a backup by creating a snapshot and then try the above process.
▶ Reduce WordPress photo size using RC and plugins
▶ WordPress Widgets: How to Switch to the Older (Classic) Version
▶ Google Fonts – How to Speed Things Up by Removing Them in WordPress
