Many people want to set up an OpenLiteSpeed (OLS) web server on Lightsail to get the most out of LiteSpeed Cache . However, first-time web server installers may not know how to proceed or what to install.
So, let’s walk through the process of installing an OpenLiteSpeed (OLS) web server on Lightsail. First, let me explain the terminology, and then I’ll explain the installation process.
- Ubuntu: The operating system for running the OpenLiteSpeed web server.
- OpenLiteSpeed: A high-performance web server that supports the LiteSpeed Cache plugin to optimize site performance.
- LiteSpeed Cache Plugin: A plugin that integrates with the OpenLiteSpeed web server to provide an optimal caching system.
Ubuntu is the optimal operating system for the OpenLiteSpeed web server to run smoothly. And the combination of OpenLiteSpeed and LiteSpeed Cache is so powerful that using them together can greatly improve the performance of your site.
※ When you install CyberPanel, OpenLiteSpeed web server and WebAdmin are installed together. And you can install WordPress and LiteSpeed Cache plugin at the same time in CyberPanel.
Table of Contents
Creating a Lightsail Instance

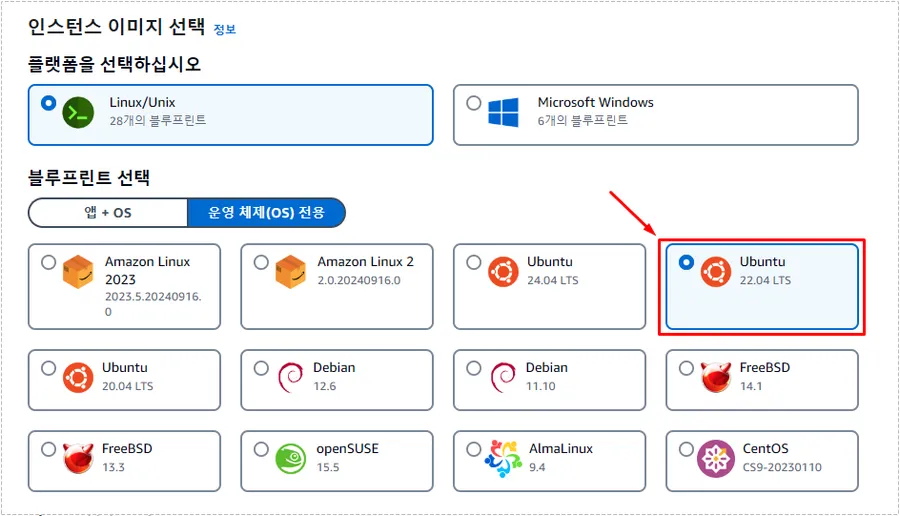
After connecting to Lightsail, click the ‘Create Instance’ button on the top right, and the screen above will appear. Here, select Seoul as the instance location, select Linux/Unix as the operating system (OS), and then select Ubuntu 22.04 LTS.
There is a latest version of Ubuntu 24.04 LTS, butYou need to select 22.04 LTS as it is not currently supported by OpenLiteSpeed .When 24.04 LTS is supported in the future, you can compare performance and consider upgrading then.
Open Network Fonts

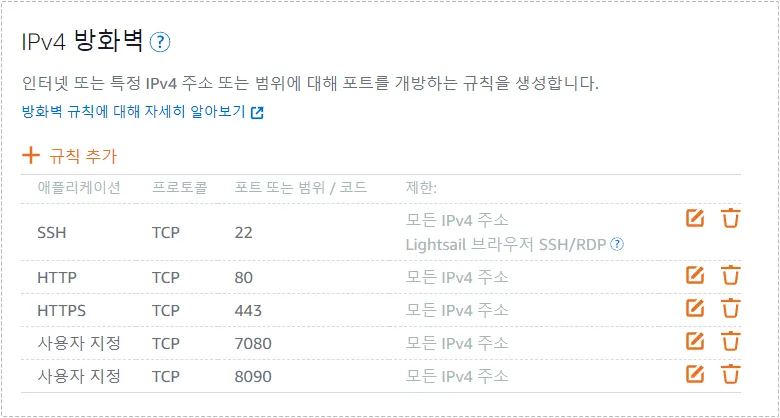
After you create an instance with Ubuntu 22.04 LTS, you need to open the ports in the firewall rules. After connecting to the newly created instance, go to the Networking tab.
Next, click ‘Add Rule’ and open HTTPS port 443 and custom ports 7080 and 8090 as shown above.
- 443 : This port allows site visitors to access your website via HTTPS. If you do not open this port, your site will be inaccessible.
- 7080 : Port for accessing the WebAdmin interface, the OpenLiteSpeed web management console.
- 8090 : Port for accessing the CyberPanel management console.
Please keep in mind the three ports above, as they are very important. When you restore an instance from a snapshot or migrate an instance later, you will need to open these ports to access the site and use the management console.
Installing CyberPanel

When you click on an instance, you will initially be presented with connection options. Here, select ‘Connect using SSH’ .
1. Switch to administrator rights
sudo su -The above command will switch to the root user with administrator privileges and load root’s environment variables and login shell.
2. Package Upgrade
sudo apt update -y && sudo apt upgrade -yThis command automatically upgrades software packages installed on the system to the latest version.
3. Install CyberPanel
sudo su - -c "sh <(wget -O - https://cyberpanel.net/install.sh)"This is a command to download the CyberPanel installation script from the web and run it directly with root privileges. The script address provided currently works normally, but it may change in the future, so if the command does not work, please check the official site .
When you run the above command, you will be asked a few questions. I will explain them in order.
- Installing OpenLiteSpeed: 1
- Full installation: Y
- Mysql: N
- Enter
- PHP: Y
- Redis, Memcached: Y
- Please type Yes or no (with capital Y, default Yes): Y
When you enter the questions as described above, the installation will begin. Usually, the installation takes about 15 to 25 minutes. When the installation is complete, you will be asked if you want to restart. At that time, press Y.
Once installation is complete, you will need to set a password to access it.
4. Set a password
sudo adminPass YOUR_NEW_PASSWORDTo set a CyberPanel password, simply enter your desired password in the YOUR_NEW_PASSWORD section.
sudo /usr/local/lsws/admin/misc/admpass.shThis command sets the WebAdmin (server management console) password.
The above two tools are used frequently, so please remember your password after entering it. If you forget your password, you can reset it using the above command.
5. Check CyberPanel and OpenLiteSpeed status
sudo systemctl status lscpdNow that everything is set up, let’s check if CyberPanel is properly installed and activated. If the ‘Active’ information is displayed when you enter the command above, it has been installed successfully.
sudo systemctl status lswsThen, you can verify that OpenLiteSpeed is installed and working properly by entering the command above.
Create a CyberPanel website
If you are using Lightsail, you will have created a static IP. You can now associate this static IP with your newly created instance. Now, to access CyberPanel, type in the address bar of your browser:https://server IP or domain:8090You can access CyberPanel by entering .
When the login screen appears, enter ‘admin’ for the user name and the password you set above.

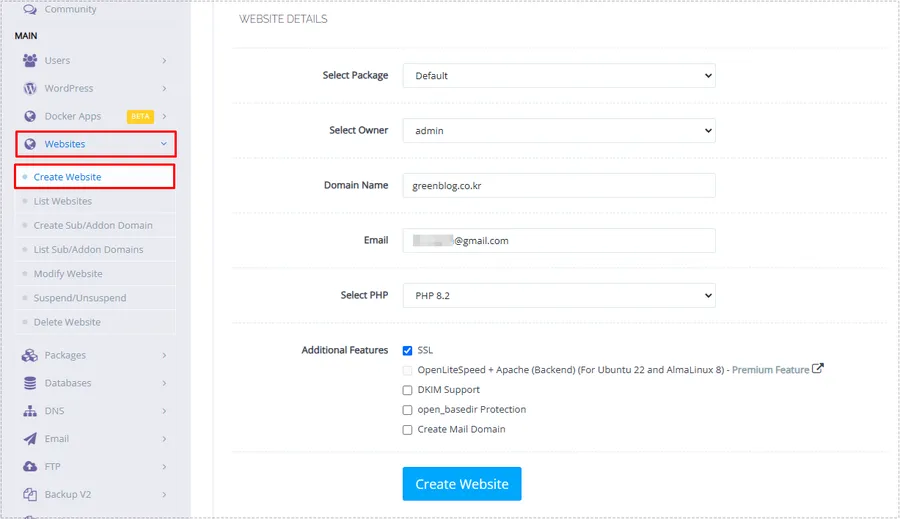
Once you’ve logged into CyberPanel, click on ‘Websites’ on the left menu and select ‘Create Website’. Then, as shown above, select your domain, email address, PHP version, and SSL option, and then click the ‘Create Website’ button to create your website.
Install WordPress + LiteSpeed plugin

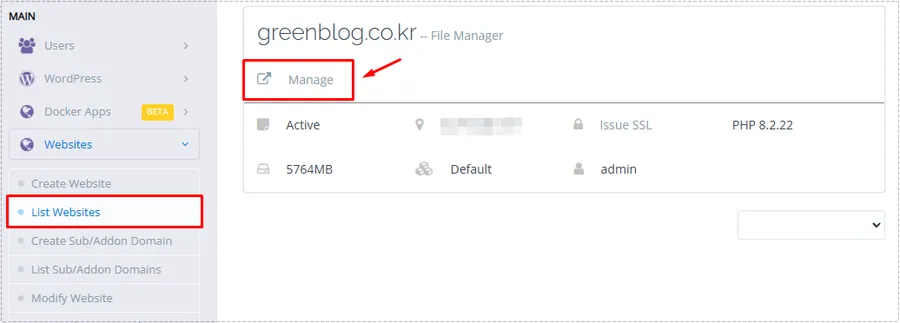
If you have created a website, you can check the created website by going to the ‘List Websites’ menu. Now, you can go to the ‘Manage’ menu to install WordPress and the LiteSpeed Cache plugin.

After entering the management menu, find WP+LSCache at the very bottom and click to install it.
All steps are complete. If SSL secure connection is not working, go to ‘List Websites’ and click ‘Issue SSL’ to install the security certificate.
From my own experience, the above process went smoothly. However, there may be cases where things don’t go as well as you expected. In this case, please refer to the official documentation to see if anything has changed.
▶ How to fix HTTPS redirect not working in OpenLiteSpeed
▶ How to enable dynamic scaling on the OpenLiteSpeed web server
▶ How to Resolve CORS Errors on the OpenLiteSpeed Web Server


