After installing the NinjaFirewall security plugin, I checked my dashboard and noticed that I was using PHP sessions for my user sessions. I was curious about this, so I did some research and found that changing to NinjaFirewall sessions would be more beneficial from a performance perspective.
According to the official blog post, NinjaFirewall uses PHP sessions by default, and most users were leaving this default setting in place. However, we realized that blocking PHP sessions can slow down your site, especially for parallel requests using AJAX.
After realizing that this could slow down my site, I consulted the official documentation to change to NinjaFirewall sessions, but it’s a bit complicated, so I’ll summarize how to set it up for those of you who want to do the same.
Table of Contents
PHP sessions

PHP Sessions is a built-in feature of PHP that allows you to effectively manage users’ sessions on your server. It is widely used because it works natively with WordPress. Many WordPress plugins utilize PHP sessions by default, so there are relatively few compatibility issues between plugins.
On the downside, if you have multiple servers, you may need to set up additional configuration to share sessions because PHP sessions are spread across different servers. Also, because it stores session data in the file system, you may experience performance degradation in high-traffic environments.
To explain the performance issue a bit further, when parallel requests (AJAX requests) occur, one request will wait for the other to complete. This can cause performance degradation for fast request processing utilizing AJAX.
To summarize, it’s good for compatibility with WordPress plugins, but it’s a performance penalty in high-traffic environments like parallel requests.
NinjaFirewall sessions

NinjaFirewall sessions work in a hybrid fashion, mixing PHP sessions with object caching. It is designed to handle sessions more securely than PHP sessions, which is an advantage from a security perspective.
NinjaFirewall handles session management more efficiently, which can reduce server load and improve performance. On the downside, it can have compatibility issues with WordPress plugins.
So if you use a lot of plugins, you’re more likely to run into compatibility issues. Also, the initial setup can be more complicated compared to PHP Sessions.
Conclusions for both sessions
If security is a priority or you value performance, a NinjaFirewall session is a good choice. On the other hand, if you don’t have any security concerns or traffic overload, you can choose PHP Sessions because they are more compatible.
I chose to switch to NinjaFirewall sessions for security and performance reasons, as I don’t have any plugin compatibility issues and am less dependent on plugins.
Changing to NinjaFirewall sessions
If you check the dashboard after the initial installation, you’ll notice that it’s working with PHP sessions. The official documentation on how to change to NinjaFirewall sessions is a bit convoluted, so the following should make it easier for you.
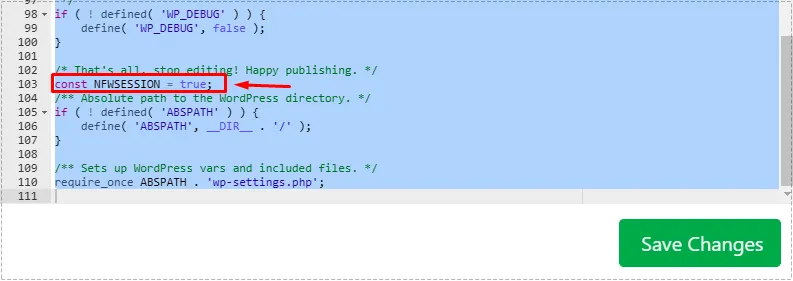
The way to change to a NinjaFirewall session is to add the following code to your wp-config.php file. However, the description doesn’t detail the exact location where the code should be placed, so please see below.
/* That's all, stop editing! Happy publishing. */

const NFWSESSION = true;

/** Absolute path to the WordPress directory. */

if ( ! defined( 'ABSPATH' ) ) {

    define( 'ABSPATH', __DIR__ . '/' );

}
After opening the wp-config.php file, add /** Absolute path to the WordPress directory. */ and add const NFWSESSION = true; just above it. You don’t need to restart the server, it will take effect as soon as you add it.
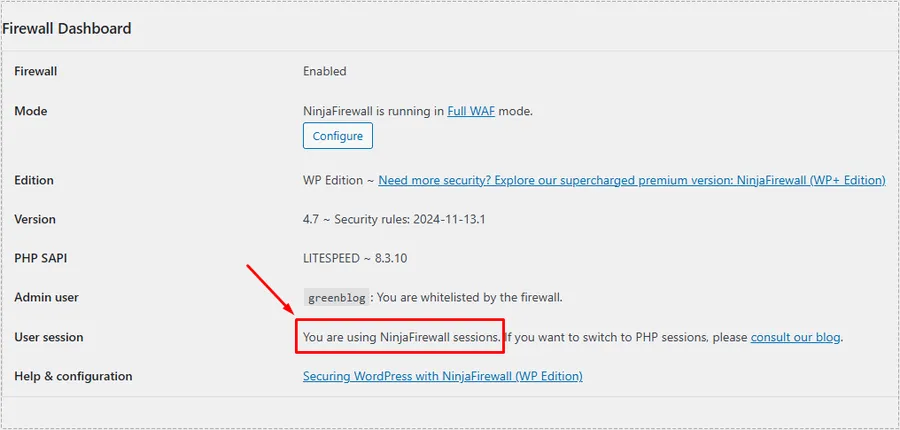
After adding const NFWSESSION = true;, navigate to your NinjaFirewall dashboard and you will see that You are using NinjaFirewall sessions has changed, as shown above.
If you don’t have any major issues with plugin compatibility, we encourage you to try changing your sessions as described above to improve security and performance.
▶ OpenLiteSpeed Reverse Proxy Setup Basic Configuration Guide
▶ WordPress Widgets: How to Switch to the Older (Classic) Version
▶ How to apply the HTTP/3 protocol to the OpenLiteSpeed web server
