Reverse proxy is useful for those who want to improve site performance by providing a variety of benefits, including increased security, load balancing, dynamic content optimization, and application server optimization.
When I switched to OpenLiteSpeed web servers, I also tried to set up a reverse proxy. I tried Nginx, Apache HTTP Server, Haproxy, Caddy, and many others, but even though I got it installed and configured, I couldn’t get a good connection and eventually gave up.
Since I’m using the OpnLiteSpeed web server, I checked to see if this was possible in the Webadmin management tool and found that it is, but it requires additional configuration beyond the default settings.
If you’re using a CDN, you’ll need to separate caching expiration and dynamic and static content caching configurations, so the basic configuration described below might not be enough to make the reverse proxy work properly.
By the way, the reason we describe the basic configuration is because there is very little documentation on how to configure reverse proxy using the OpenLiteSpeed WebAdmin administration tool. Please note that this article is written for those who are not familiar with the basic configuration and does not include detailed system-specific settings.
Table of Contents
Advantages of reverse proxy
- Enhanced security: Reverse proxies hide the real web server from the outside world, block security threats, and provide security by filtering malicious requests, shutting down SSL, or setting up a web application firewall (WAF).
- Load balancing: Reverse proxy distributes traffic across multiple servers, efficiently managing server load and increasing the performance of your website. Load balancing is especially effective if you have a lot of dynamic content.
- Dynamic content optimization: Reverse proxies can process or cache dynamic content generated by the server. They also provide features like SSL termination and cookie management to improve server performance.
- Optimize application servers: By integrating with multiple backend servers, it can optimize complex requests from applications. This is important in large systems.
To summarize, we recommend using a reverse proxy when you need to manage dynamic content and traffic for added security.
Access the OpenLiteSpeed Webadmin
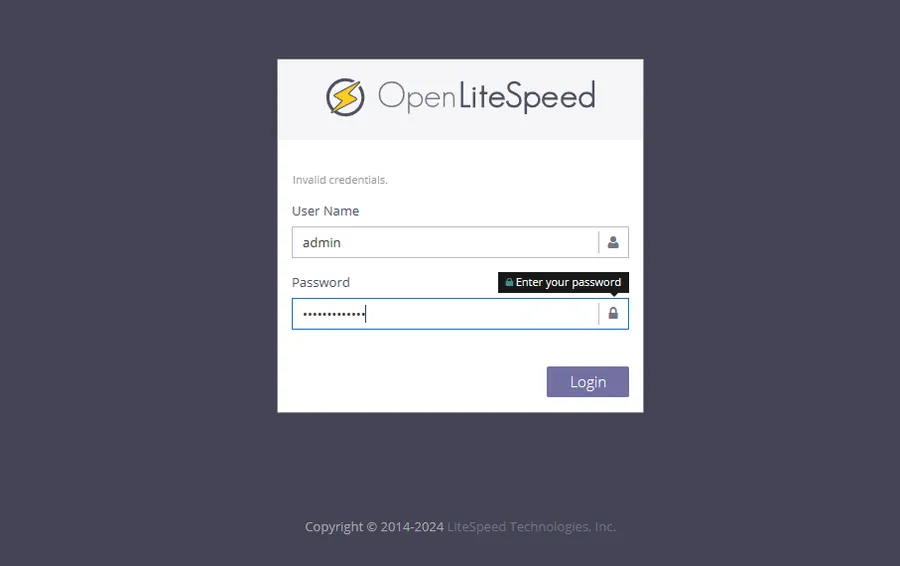
If you’ve configured your OpenLiteSpeed web server, you should know how to access the OpenLiteSpeed WebAdmin. For those who don’t, enter the IP address :7080 (ex.123.12.23.24:7080) in your browser’s address bar and you’ll see the login screen shown above.
If you’re new to LiteSpeed WebAdmin and don’t know your password, you can refer to our post on how to access the LiteSpeed WebAdmin admin panel.
Add a server in Web Server settings
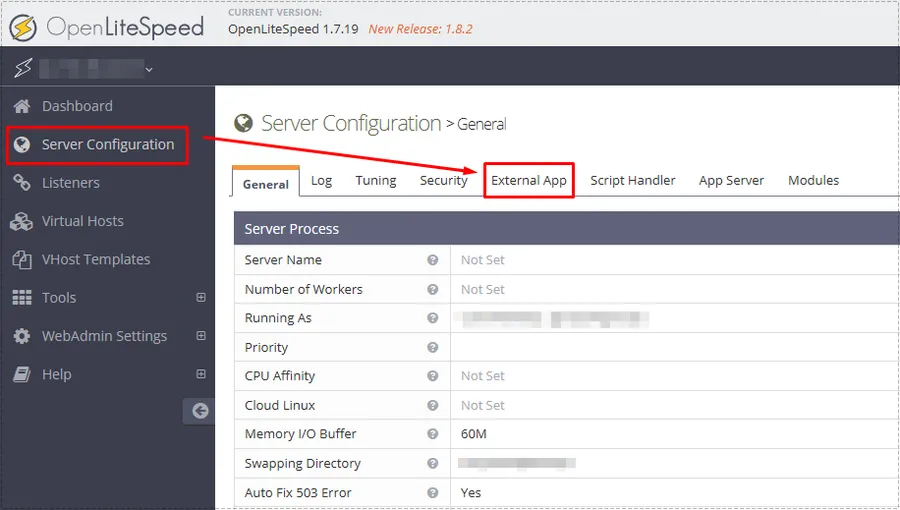
To configure a reverse proxy, you must first add a target server. You can do this by accessing the OpenLiteSpeed WebAdmin, selecting ‘Server Configuration’ from the left menu and navigating to ‘External App’ in the top category.
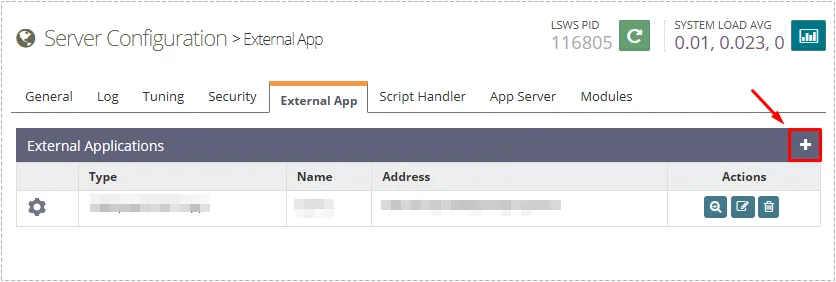
Once you’re in External App, you can add it by pressing the + button on the right.
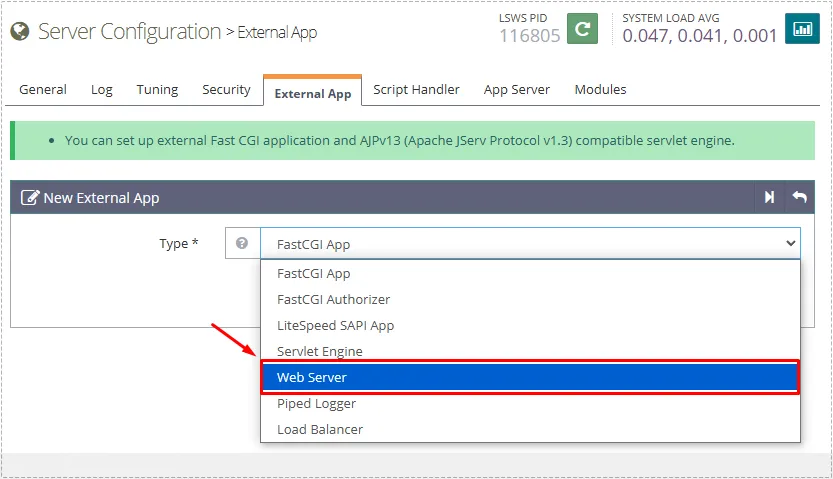
Press the + button to bring up the New External App screen, where you can select Type as Web Server and press the Next button in the top right corner.
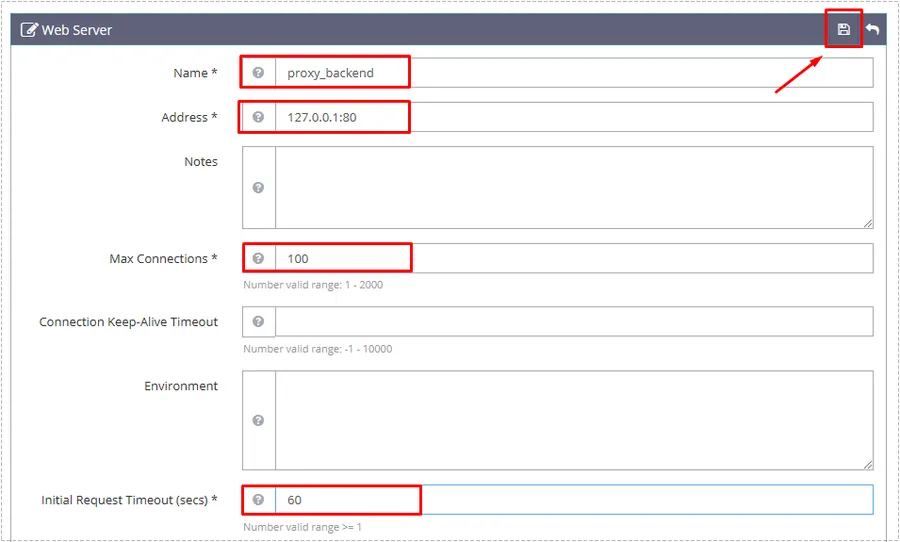
If you select Web Server as the Type, you’ll see the settings screen like the one above, which you can enter as follows.
- Name: Proxy_backend
- Address: 127.0.0.1:80
- Max Connections: 100
- Initial Request Timeout: 60
- Retry Timeout: 0
- Response Buffering: NO
The important thing about the settings here is that you need to set the Address to match your system. By default, you can set it to listen on port 127.0.0.1:80 or 8080, which is localhost:8080.
If you want to handle requests coming in over HTTPS, you can set it to 127.0.0.1:443. There’s no one right answer here, so you’ll need to set it up in a format that works for you.
Once you’ve entered all of your settings, click the Save button in the top right corner to finalize. Now that you’ve added the target server, you can set up the Context to apply the reverse proxy.
Setting up the Context definition
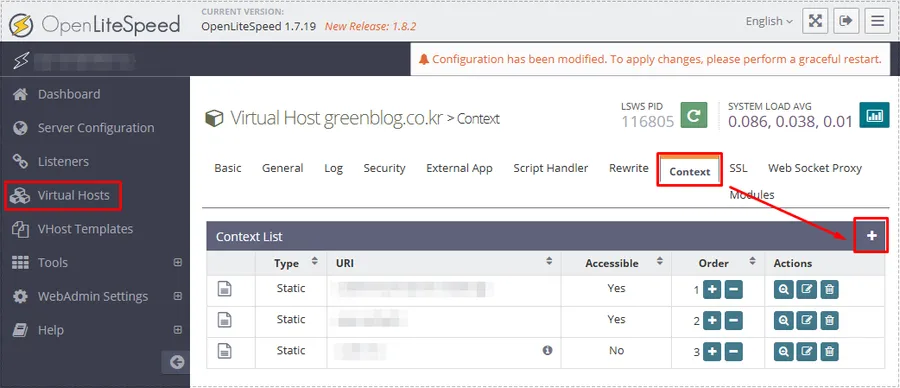
In order to apply reverse proxy, you need to define a Context, which you can do by going into your Virtual Hosts settings, selecting Domains, selecting Context at the top, and pressing the + button to add it.
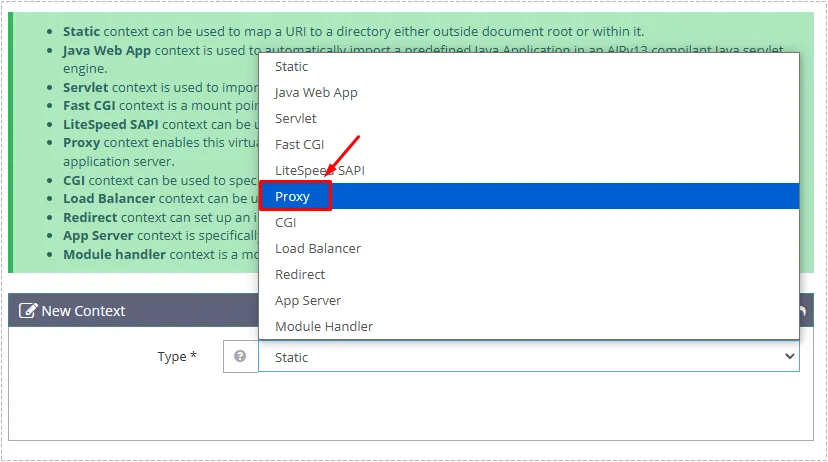
Pressing the + button will take you to the New Context screen, where you can select Type as Proxy, and then click the Next button in the top right corner.
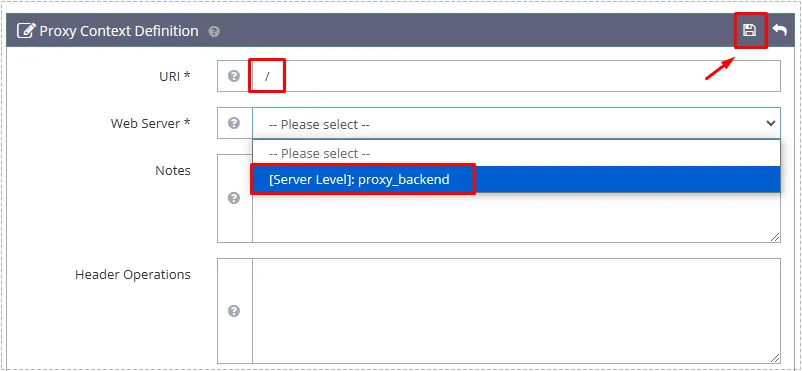
The Next button will take you to the Proxy Context Definition settings. Here you can enter a ‘/’ in the URL, select the target server you created above, and then click the Save button in the top right corner.
Now you can restart the server by clicking on the IP address in the top left corner of the OpenLiteSpeed WebAdmin. This will complete all the basic configuration.
The above configuration should get your reverse proxy working, but depending on your system environment, you may need additional settings, so please browse to your own system environment to find them.
▶ How to resolve the browser error net::err_name_not_resolved
